7 Effective Ways to Do the Plank
")
The plank is one of the most popular exercises among fitness enthusiasts and professional athletes. It’s simple to perform, yet incredibly effective. When holding a plank, the abdominal muscles , back, glutes, and shoulders are actively engaged, which helps improve overall physical fitness. The plank also helps develop stability and improve posture , which is especially important in everyday life. The exercise can be modified by changing the position of your hands or adding dynamic elements, allowing you to adapt it to any fitness level. Regular workouts with planks increase strength and improve athletic performance.
Article contents:
1. Forearm planks
Assume a forearm plank position: your elbows should be directly beneath your shoulders, your hands clasped together, and your body aligned—your hips should be in line with your shoulders, and your core should be tight and engaged. Keep your head level with your body—look straight ahead or at your hands, without dropping your chin. Hold the pose for 30 seconds, breathing deeply to engage your core muscles. Increase the duration of the plank by 15 seconds every day.
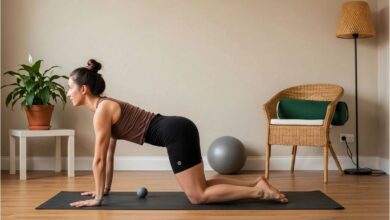
2. Plank with rhythmic hip lifts
Get into a classic forearm plank: elbows directly under your shoulders, hands clasped together, torso aligned, and abs engaged. Lift your right leg, keeping your body straight, and bend your knee so that your foot is pointing upward. Perform short, pulsing movements with your leg—lift and lower it up and down. Do 2 sets of 8 repetitions, then switch legs.
Tip: Make sure your pelvis doesn’t sag downward and your core remains stable—this will prevent unnecessary strain on your lower back and increase the exercise’s effectiveness.
3. Plank with Knee Touch
Start in a forearm plank position: your elbows should be directly under your shoulders, your hands clasped together, your torso straight, and your core engaged and tight. Take a deep breath, and as you exhale, pull your stomach in as much as possible, as if you were fastening a pair of tight-fitting, high-waisted pants. Then bend your knee and touch the mat with it. As you inhale, smoothly return to the starting position. Do 8 repetitions on one leg, then switch to the other side and repeat.
This exercise effectively targets the lower abs. It’s important to carefully control your abdominal muscles to protect your lower back from excessive strain.
Tip: For additional lower back support, you can perform the exercise on a softer surface or a yoga mat.
4. Plank with Torso Rotation (Twist)
Assume the classic forearm plank position—your body should form a straight line from your heels to your head. Take a deep breath, and as you exhale, engage your obliques and gently twist your torso to the left without letting your hips touch the floor. Then inhale and return to the starting position. On the next exhale, twist to the right. Repeat 8 times on each side, focusing on your breathing and engaging your obliques
important note: Avoid sudden movements and forcing twists—it’s better to work your core muscles slowly and in a controlled manner to prevent injury.
5. Side-Lifting Plank
Assume a forearm plank position: elbows directly under your shoulders, hands clasped together. Engage your core and glutes. As you exhale, lift your left leg and extend it to the side, touching the floor. As you inhale, return to the center. On your next exhale, repeat the same movement with your right leg. Perform 8 repetitions on each side. Engage your core muscles to stabilize your body, and move your leg using your Helpful tip: To make the exercise more challenging, you can increase the range of motion or hold the end positions for 1–2 seconds to increase the intensity
6. Plank with balancing
Get into a forearm plank: keep your elbows directly under your shoulders, your forearms parallel to each other, and your palms facing up. Find a comfortable position to maintain a stable balance. Lift your right leg and extend your heel upward, making sure your hips remain level. Maintain your balance while simultaneously extending your left arm forward. If you struggle to balance at first, don’t get discouraged. Hold the pose for 15 seconds, then slowly lower yourself back to the starting position and repeat on the other side.
Tip for beginners: To help with your balance, you can perform the exercise next to a support (a chair or a wall) for safety.
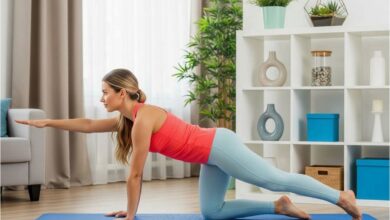
7. Plank with Knee-to-Hand Pull
Assume a plank position with your palms on the floor. Fix your gaze on the floor, slightly in front of your fingers, in the center of your body. Lift your right leg off the floor and, as you exhale, bring your knee toward your right hand, keeping your shoulders above your wrists and your back straight. Inhale, and as you exhale, twist at the waist, bringing your knee toward your left hand. Perform the movement in reverse order, returning to the starting position. Do 8 repetitions, then switch sides.
Note: Keep your core as tight as possible and do not let your hips sway to maintain stability and avoid injury.
General recommendations:
Before starting the plank, do a light warm-up to prepare your muscles and joints.
- Maintain proper breathing—this will help keep your muscles toned and increase your endurance.
- If you feel back pain or discomfort, stop the exercise and consult a doctor or trainer if necessary.
- Consistency is the key to success. Do the plank daily or every other day, gradually increasing the intensity.
- The plank is an isometric
exercise that is widely used in fitness to strengthen the core muscles. It involves holding the body in a straight position, supported by the forearms and toes. The main goal is to engage the abdominal, back, gluteal, and shoulder muscles. Proper plank technique involves aligning the body from head to heels, which minimizes the risk of injury and maximizes the effective load on the major muscle groups The exercise is excellent for developing not only strength but also endurance, stability, and coordination, making it a versatile addition to any training program 7 effective variations of the plank